
Configure Cluster Details
This page explains how to configure cluster details in Pulse so that it can automatically detect your cluster setup including the list of services, their versions, security settings, and other configuration details. Some information must still be entered manually.
You can add and configure multiple clusters in the Admin UI to monitor them in a single Pulse UI. On a configured cluster, click Launch Pulse UI to navigate the Pulse UI.
Steps
Cluster Details
- In the Admin UI, click + Add Cluster.
- Enter the following cluster details, then click Next.
Field | Description |
|---|---|
Cluster Type | Select the cluster type based on your environment (e.g., Ambari, Cloudera, Spark on Kubernetes, Standalone, Custom, etc.). |
Cluster URL | Enter the Ambari, Cloudera, or relevant cluster URL. |
Username | Enter the Ambari, Cloudera, or relevant username. |
Password | Enter the corresponding password for the username. |
Cluster Name | Enter a unique identifier for the cluster. |
Cluster Display Name | Enter the display name that will appear in the Pulse UI. |
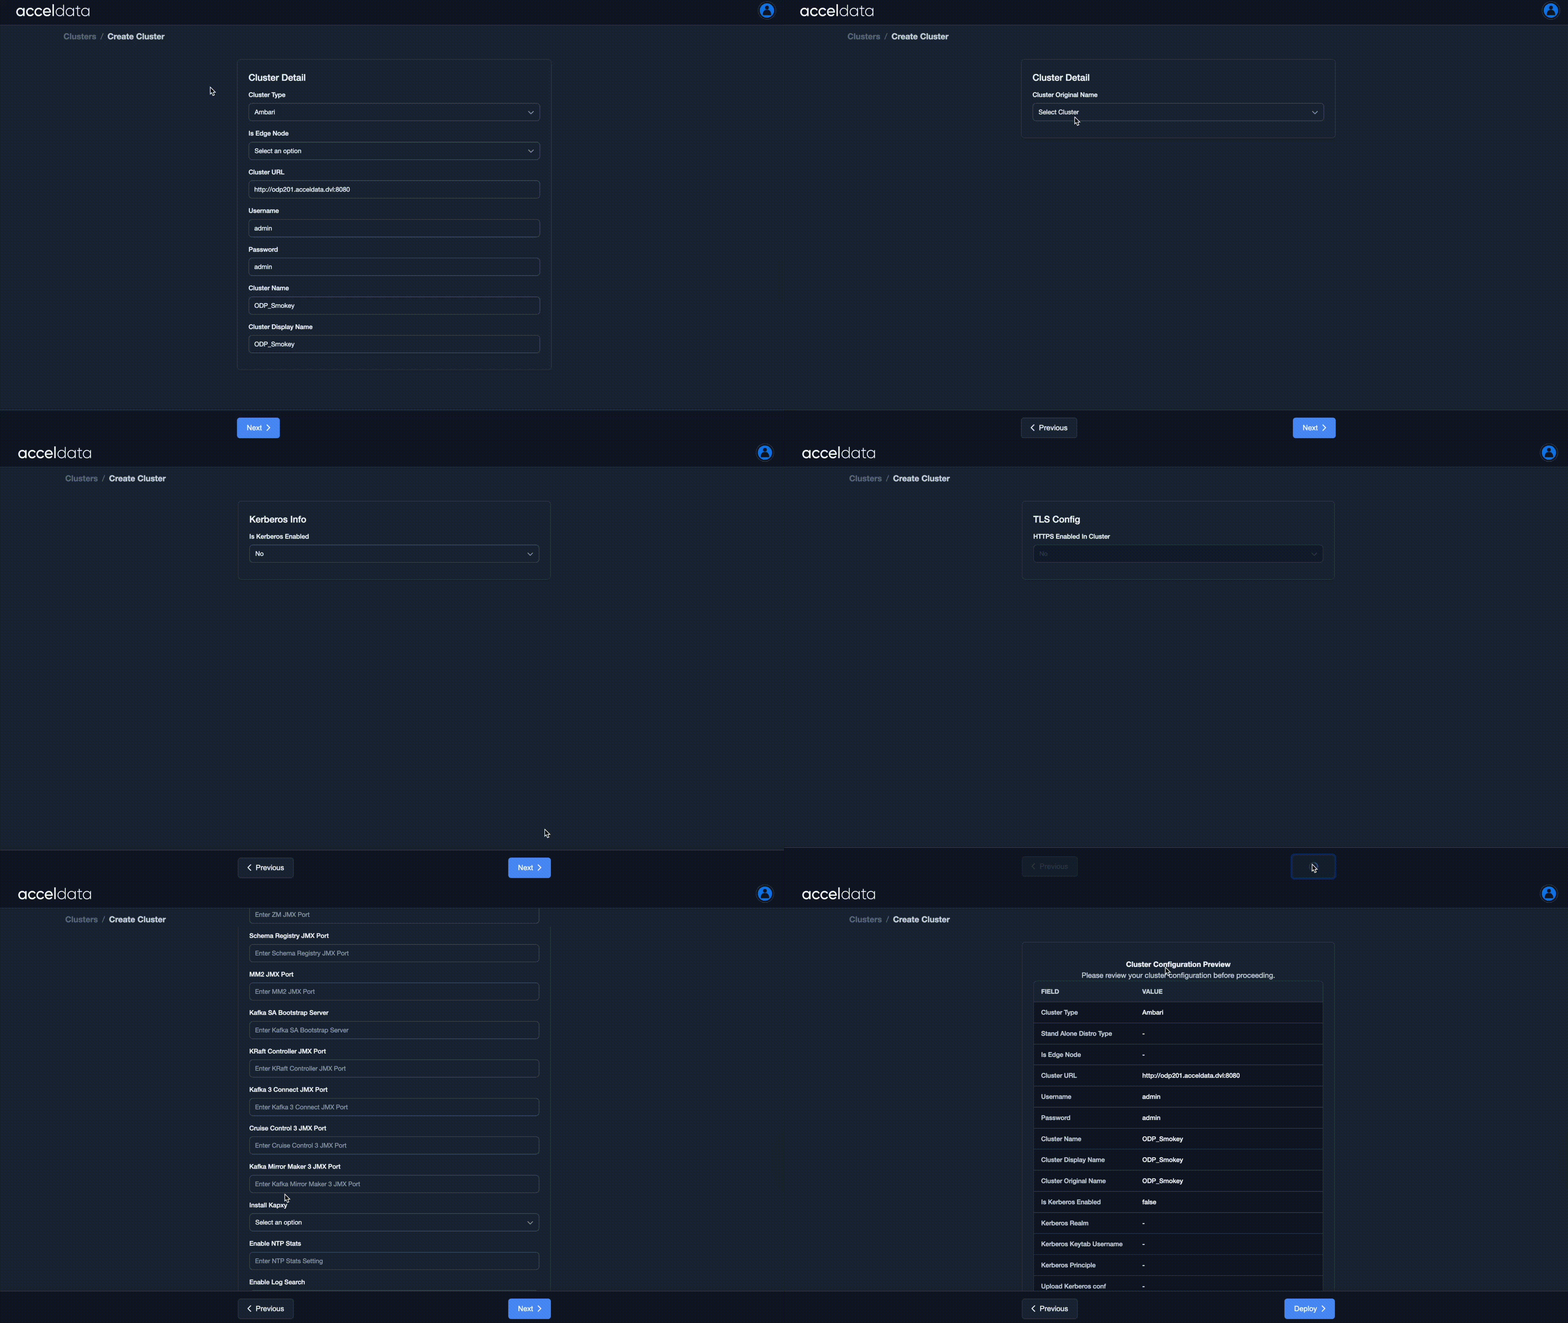
Select Cluster Original Name
- From the list of clusters, select the original cluster name you want to monitor using Pulse.
- Pulse uses the URL, username, and password you provided to automatically fetch the list of available clusters. Click Next to continue.
Enter Kerberos Information
When prompted, select whether your cluster is kerberized.
- Select Yes if Kerberos is enabled, and provide the following details:
- Kerberos Realm
- Kerberos Keytab Username
- Kerberos Principal
- Krb5 conf
- Kerberos keytab
- Select No if Kerberos is not enabled.
- Click Next to proceed.
Enter TLS Settings
- Select Yes if HTTPS is enabled in your cluster, and upload the CA certificate when prompted.
- If not, select No.
- Click Next to proceed.
Enter Service Details
Pulse automatically fetches the list of installed services, their versions, and related configurations (such as database names, ports, and URLs).
- Review the pre-filled details (for example, version numbers and detected configurations).
- For fields where the details are not available, such as database names, JMX ports, etc., enter the required values manually.
After verifying and entering all necessary details, click Next to continue.
Info
The following configurations may vary depending on the cluster setup and deployed services. These are example values for reference only and may differ across environments.
Ensure that the same port numbers (default or custom) used for service communication in the cluster configuration of Ambari, Cloudera, or other cluster managers are also configured in Pulse (below) to enable successful communication.
For details on cluster configuration in Ambari, Cloudera, etc., see Configure Hadoop Cluster Changes
Field Name | Instruction | Example / Default Value |
|---|---|---|
HBase Version | Auto-populated | 2.5.8 |
Hive Version | Auto-populated | 4.0.0 |
Hive Metastore DB Name | Enter Hive Metastore DB Name | hive_metastore |
Hive Metastore DB URI | Enter Hive Metastore DB URI | jdbc:mysql://db-host:3306/hive_metastore |
Hive Metastore DB Username | Enter Hive Metastore DB Username | hiveuser |
Hive Metastore DB Password | Enter Hive Metastore DB Password | |
Kafka Version | Auto-populated | 2.8.2 |
Kafka Broker Port | Enter Kafka Broker Port | 9092 (Default) |
Kafka Log Dirs | Enter Kafka Log Dirs | /var/log/kafka |
Kafka JMX Port | Enter Kafka JMX Port | 9999 (Default) |
NiFi ZK Enabled | Select Yes if NiFi ZooKeeper is enabled, else select No | Yes |
NiFi Registry Installed | Select Yes if NiFi Registry is installed, else select No | |
NiFi Registry URL | Enter NiFi Registry URL | |
Ranger Admin JMX Port | Enter Ranger Admin JMX Port | 6080 (Default) |
Ranger User Sync JMX Port | Enter Ranger User Sync JMX Port | 5151 (Default) |
Ranger Tag Sync JMX Port | Enter Ranger Tag Sync JMX Port | 5152 (Default) |
Ranger KMS JMX Port | Enter Ranger KMS JMX Port | 9292 (Default) |
Spark 3 Version | Auto-populated | 3.5.1 |
Spark 3 History HDFS Path | Enter Spark 3 History HDFS Path | /spark-history |
ZK Enabled | Select Yes if ZooKeeper is enabled, else select No | |
HMS JMX Port | Enter Hive Metastore JMX Port | 7001 (Default) |
HS2 JMX Port | Enter HiveServer2 JMX Port | 7002 (Default) |
ZM JMX Port | Enter Zeppelin Master JMX Port | 7003 (Default) |
Schema Registry JMX Port | Enter Schema Registry JMX Port | 7788 (Default) |
MM2 JMX Port | Enter MirrorMaker 2 JMX Port | 7777 (Default) |
Kafka SA Bootstrap Server | Enter Kafka SA Bootstrap Server | kafka-broker:9092 |
KRaft Controller JMX Port | Enter KRaft Controller JMX Port | 9997 (Default) |
Kafka 3 Connect JMX Port | Enter Kafka 3 Connect JMX Port | 8083 (Default) |
Cruise Control 3 JMX Port | Enter Cruise Control 3 JMX Port | 8090 (Default) |
Kafka Mirror Maker 3 JMX Port | Enter Kafka Mirror Maker 3 JMX Port | 8084 (Default) |
Install Kapxy | Select Yes to install Kapxy, else select No | |
Enable NTP Stats | Enter the NTP Stats setting | |
Enable Log Search | Select Yes to enable Log Search, else select No | |
Enable Impala Agent | Select Yes to enable Impala Agent, else select No | |
HiveServer2 Interactive Kerberized | Select Yes if HS2 Interactive is Kerberized, else select No | |
Is Impala Kerberized | Select Yes if Impala is Kerberized, else select No | |
Stand-Alone Components | Enter names of stand-alone components | Spark, Kafka, Kafka 3, and NiFi |
SA Spark History URL | Enter Stand-Alone Spark History URL | |
SA Spark History URL | Enter Stand-Alone Spark History URL | |
MM2 Enabled | Select Yes if MirrorMaker 2 is enabled, else select No | |
Kafka Connect Enabled | Select Yes if Kafka Connect is enabled, else select No | |
Cruise Control Enabled | Select Yes if Cruise Control is enabled, else select No | |
Cruise Control 3 Enabled | Select Yes if Cruise Control 3 is enabled, else select No | |
Spark on K8s | Select Yes if Spark on Kubernetes is enabled, else select No |
Preview and Confirm
- Review all configuration details in Preview.
- If any changes are needed, click Previous to go back and update the information.
- Once confirmed, click Next to complete the configuration.
Next Step
For details about applying the configurations and deploying Core services, see Deploy Pulse Core Services.